Ejector pin marks are a common defect on molded parts, appearing either as indentations or raised impressions on the surface. Their presence can significantly affect the product’s appearance. The causes are complex, involving part design, mold design, molding machine and processing parameters, material properties, and human factors.
What Are Ejector Pin Marks?
Ejector pin marks are surface imperfections that appear on molded parts during the injection molding process. These marks are caused by the interaction between ejector pins and the part during ejection from the mold. While ejector pins are essential for pushing the part out of the mold after it cools and solidifies, improper handling can leave visible marks on the surface.
Typically, ejector pin marks are small, indented, or raised spots located where the ejector pins contact the part. These imperfections can be cosmetic or more pronounced, depending on the mold and process parameters. For applications where a high-quality finish is essential, such as in electronics or automotive parts, ejector pin marks can be a significant concern.
However, ejector pin marks are technically unavoidable in the sense that pins always leave some trace, but they can be minimized to the point where they’re either invisible or non-critical. With good part design, smart toolmaking, and optimized molding parameters, the pin marks can be visible or objectionable.

The Ejection Process and Ejector Pin Marks
How Ejector Pins Work in the Injection Molding Cycle
In the injection molding process, molten plastic is injected into a mold cavity, where it cools and solidifies into the desired shape. Once the part has cooled, the mold is opened, and the ejector pins are activated to push the molded part out of the cavity.
These pins apply force to eject the part without damaging it. The force, speed, and timing of this action must be carefully controlled to ensure a smooth ejection. If these parameters are not properly managed, ejector pin marks can form on the surface of the part.
How Ejector Pins Cause Ejector Pin Marks
Ejector pins are responsible for both ejecting the part and potentially causing ejector pin marks. These marks typically form where the pins make contact with the part, often leaving small indentations or visible spots. The pressure exerted by the ejector pins during ejection, combined with the mold design and material properties, determines the likelihood and severity of these marks.
Ejector pin marks are more likely to appear on areas where the pins come into direct contact with the molded part. If the ejector pins are improperly sized, positioned, or exert uneven pressure, these marks may become more prominent. Additionally, the cooling rate and material type affect how the part reacts during ejection, further influencing the formation of ejector pin marks.
Read our blog: What is an ejector pin to learn more about its working process.
What Causes Ejector Pin Marks and How to Prevent
There are many reasons that may cause ejector pin marks, and there are several methods to get rid of ejector pin marks.
Excessive Ejection Force
If the part sticks too tightly to the core side, the ejector pins need more force to push it off, which can leave deep or visible marks. This is often caused by insufficient draft angles, poor mold release, or shrinkage locking the part to the mold.
Solution:
First, check the part design. Increasing draft angles can make a big difference because even a degree or two more can reduce sticking dramatically. On the mold side, applying proper surface finishes or coatings, or adding mold release where appropriate, helps parts slide off with less resistance. If shrinkage lock is the issue, uniform cooling and balanced wall thickness can ease the release and reduce the stress on pins.
High Injection and Packing Pressure
Overly high packing or holding pressure can also leave pin marks. When molten plastic is forced too strongly against the cavity wall, it presses into the areas where ejector pins sit. As the material solidifies, the trapped pressure often appears as small sinks or raised spots right where the pin contacts the part. This happens especially commonly in thin-walled parts or where ejector pins are located behind cosmetic surfaces.
Solution:
Try to lower packing pressure or shorten the holding time so material isn’t forced into the ejector pin areas unnecessarily. From a design standpoint, moving pins away from highly visible surfaces or backing them up with larger surface-area ejectors like blades or sleeves can distribute the force more evenly and prevent obvious marks.
Improper Pin Design and Placement
Pins located in thin-walled regions or visible cosmetic zones will nearly always leave noticeable traces. If there are too few pins to distribute the ejection load, each one carries excessive force, producing deeper impressions. Oversized or misaligned pins, or those not flush with the cavity surface, make the problem even more obvious.
Solution:
Pin marks often come down to poor design decisions. Ejector pins should be positioned in non-cosmetic areas or on surfaces that will later be hidden, textured, or machined. Where that’s not possible, using larger numbers of smaller pins spreads the ejection load rather than concentrating it. Engineers should also make sure pins are perfectly flush with the cavity face, since even a small protrusion or recess is visible on the final part. In critical areas, switching to alternative ejection methods, such as stripper plates or air ejection, can avoid pin marks altogether.
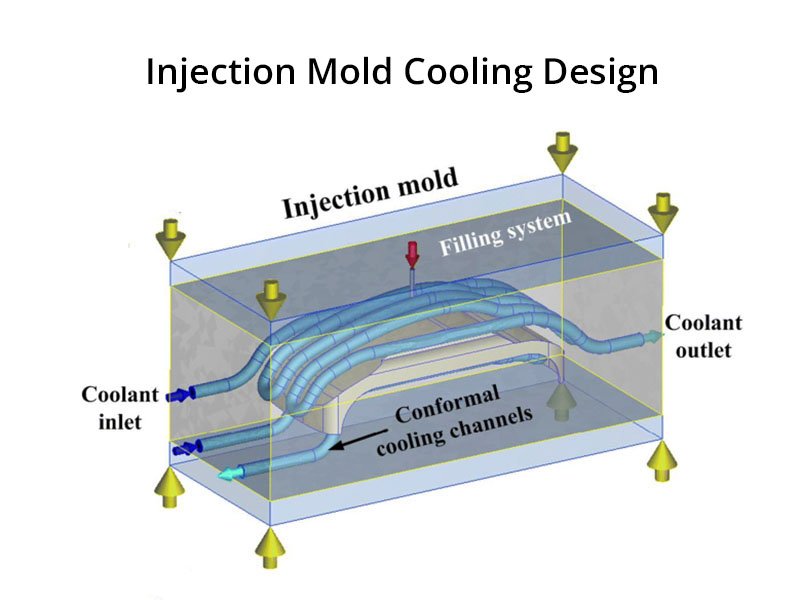
Inadequate Cooling During Injection Molding Process
Parts that cool unevenly tend to grip the mold more tightly in specific areas, making ejection more difficult. This additional resistance transfers to the ejector pins, which must push harder to release the part. The result is stronger and more visible marks, often concentrated in sections where cooling imbalance is greatest.
Solution:
When cooling isn’t balanced, parts grip certain mold regions more tightly, making ejection harsher. To fix this, try to improve cooling design with more uniform channel layouts, baffles, or conformal cooling inserts to stabilize shrinkage. Cycle time adjustments, such as longer cooling, can sometimes help too, though that usually impacts efficiency. The ultimate goal is to make the part release evenly, which takes the burden off the pins.
Material Properties
Certain plastics make the issue worse. High-friction resins or filled materials like glass-reinforced grades resist ejection more than unfilled, free-flowing polymers. This added resistance means the pins must exert more force, which naturally leaves a stronger footprint on the molded surface.
For example, thermoplastic materials with high shrinkage rates are more likely to exhibit ejector pin marks compared to low-shrinkage materials. Additionally, the surface finish of the material plays a role—smooth, glossy materials tend to show ejector pin marks more readily than matte or textured materials.
Solution:
When the material itself is the main culprit, options are more limited but still workable. Switching to a grade with better release characteristics or adding internal lubricants to the resin can make ejection smoother. If changing resin isn’t possible, mold modifications such as applying surface coatings or using a different ejection method can compensate. In production, optimizing mold temperature and using mold release sprays as a temporary measure can also keep pin marks under control.
Ejector Pin Mark Removal and Mitigation
If ejector pin marks had appeared on injection molding parts, the following are some tips to remove and mitigate them.
Post-Molding Techniques for Reducing Ejector Pin Marks
If ejector pin marks are already present on molded parts, post-processing can be used to improve surface appearance. Techniques such as light machining, buffing, or applying a fine abrasive polish can smooth out raised spots or shallow impressions. For plastic components that allow it, controlled heat treatment or vapor polishing can reflow the surface slightly and reduce visible blemishes. While these approaches are effective for cosmetic improvement, they are typically best suited for low- to medium-volume production, since they add time and cost per part.
Surface Treatment Options: Polishing, Sanding, and More
Surface treatments are another way to hide or remove ejector pin marks. Manual or automated sanding can level out small indentations, while polishing restores a uniform finish across the entire part surface. For higher-end applications, secondary finishing techniques such as bead blasting, painting, or applying decorative coatings not only mask marks but also improve aesthetics and durability. Texturing is often used in consumer products to disguise pin locations entirely, making them virtually invisible in the final part.
Using Mold Coatings to Minimize Marks
Preventing ejector pin marks at the source often comes down to reducing friction during ejection. Mold coatings such as titanium nitride (TiN), diamond-like carbon (DLC), or nickel-based coatings create smoother, harder surfaces on both cavity steel and ejector pins. These coatings reduce wear, lower breakout force, and prevent the resin from sticking to the pin faces. In practice, this means less ejection pressure is required, so marks are minimized before they even form. Mold coatings are especially valuable in high-volume production or when working with sticky or filled materials.
Reworking Ejector Pins: Solutions for Existing Mark Issues
When marks are caused by the pins themselves, reworking is often the most direct solution. Pins should be inspected for wear, scratches, or misalignment and either re-polished or replaced if they no longer sit flush with the cavity surface. In some cases, downsizing pin diameter or increasing the number of pins can spread the ejection force more evenly and prevent deep impressions. For parts with strict cosmetic requirements, engineers may opt to relocate pins to non-visible areas or replace them with alternative ejection methods such as sleeves or lifters. Regular preventive maintenance ensures pins remain in proper condition and avoids recurring surface issues.
Ejector Pin Marks vs. Other Molding Defects
Differentiating Between Ejector Pin Marks and Flash
Ejector pin marks should not be confused with flash, a separate molding defect. Flash refers to excess material that escapes from the mold cavity during injection and is visible along the parting line or in other areas of the part. Flash is typically caused by improper mold closing or excessive injection pressure, whereas ejector pin marks occur due to pressure imbalances or poor pin placement during the ejection process. Understanding the distinction between the two is important for troubleshooting and preventing these defects.

Understanding the Difference Between Pin Marks and Sink Marks
Ejector pin marks are distinct from sink marks, which are depressions or indentations in the surface of the part caused by uneven cooling or excessive packing during injection. While sink marks are often a result of inadequate cooling or poor material flow, ejector pin marks occur specifically during the ejection phase. Identifying the type of defect is critical in determining the root cause and implementing the appropriate corrective measures.

How to Identify Ejector Pin Marks from Other Surface Defects
Ejector pin marks are often circular or slightly oval depressions that appear on the surface of a molded part, typically at the locations where the ejector pins made contact. These marks are typically shallow and localized, with a consistent pattern that can be traced back to the pin positioning. By contrast, other defects like surface cracks, burn marks, or streaking tend to have different shapes, patterns, and causes. A detailed inspection of the part, along with an understanding of the molding process, can help identify ejector pin marks and distinguish them from other surface defects.
Conclusion
Ejector pin marks are a common challenge in the injection molding process, but with careful attention to detail, they can be minimized or eliminated. By understanding their causes and implementing preventative strategies—such as optimizing injection parameters, improving cooling, and refining mold design—molders can reduce the risk of these marks. When marks do occur, post-molding techniques, surface treatments, and mold adjustments can help mitigate their appearance. Identifying and addressing ejector pin marks early in the production cycle is key to ensuring high-quality, defect-free molded parts.