Demolding is the final step in the injection molding process, where the solidified part is removed from the mold. If the demolding process is not handled properly, the molded part may stick to the mold, causing deformation or warping. Such defects can negatively impact the product’s appearance at best, or, at worst, affect the product’s assembly. In the following, we will explain what demolding is and how to avoid product defects caused by poor demolding processes.
What is Demolding in Injection Molding?
Demolding is defined as the final stage of the injection molding process, where the solidified plastic part is extracted from the mold cavity after cooling and solidification. This step is pivotal for maintaining part quality, ensuring production continuity, and protecting the mold’s integrity. The process is sensitive to timing, with premature demolding risking deformation and delayed demolding potentially slowing production cycles.
Key Steps of Demolding Process
The demolding process can be broken down into several key stages, the key steps are cooling and solidifying the part, removing the part from the mold, and ejection.
1. Cooling and Solidification
This initial stage ensures the part reaches dimensional stability, preventing defects like sink marks or warping. Cooling time varies by material and wall thickness, for instance, for a 0.2mm wall thickness molding part, cooling typically takes 10-15 seconds, extending to 15-25 seconds for glue-coated products. Uniform cooling is vital, often achieved through conformal cooling channels, to avoid stress-induced deformation.
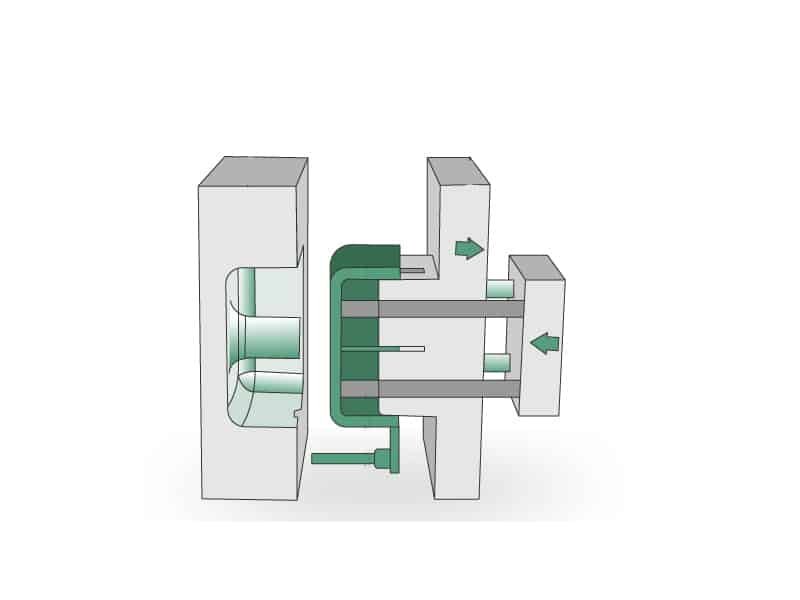
2. Ejection
Ejection involves mechanisms to physically remove the part from the mold. There are several common ejector mechanisms, the choice of mechanism depends on part geometry, material proerties, and mold design. Common methods include:
- Ejector Pins: Located on the ejector side, activated by hydraulic or mechanical systems to push the part out.
- Sleeve Ejectors: Used for parts with complex geometries, providing even force distribution.
- Blade Ejectors: Suitable for thin-walled or delicate parts to minimize damage.
- Stripper Plates: A movable plate on the opposite side, pushing the part off the core or cavity side.
3. Part Removal
After ejection, the part is removed, either manually for complex or fragile parts or automatically using robotic systems for large-scale production. Automation enhances efficiency and consistency, particularly in high-volume manufacturing.
Material Considerations in Demolding
Material properties significantly influence demolding ease and effectiveness, like melt fluidity, thermal deformation temperature, surface energy, and thermal expansion coefficient. It is essential to consider mold temperature and release agent selection based on these factors.
Thermoplastics shrink upon cooling, facilitating demolding, like polypropylene are easier to demold, but materials like polycarbonate may stick, requiring release agents.
Thermosetting Plastics (e.g., epoxy, phenolic resin) are more challenging post-curing, with a higher risk of cracking, necessitating special mold designs and ejection mechanisms.
Smooth mold surfaces, often treated with coatings like PTFE, nickel, or chrome, help reduce friction during the demolding process. Additionally, the use of mold release agents, particularly silicon-based ones, creates a non-stick layer that not only facilitates the
Challenges in the Demolding Process
Demolding may seem like a straightforward step in injection molding, but it introduces a range of technical challenges that can compromise part quality and production efficiency. One of the most common issues is parts sticking to the mold, which can result in deformation, surface damage, or even complete part rejection.
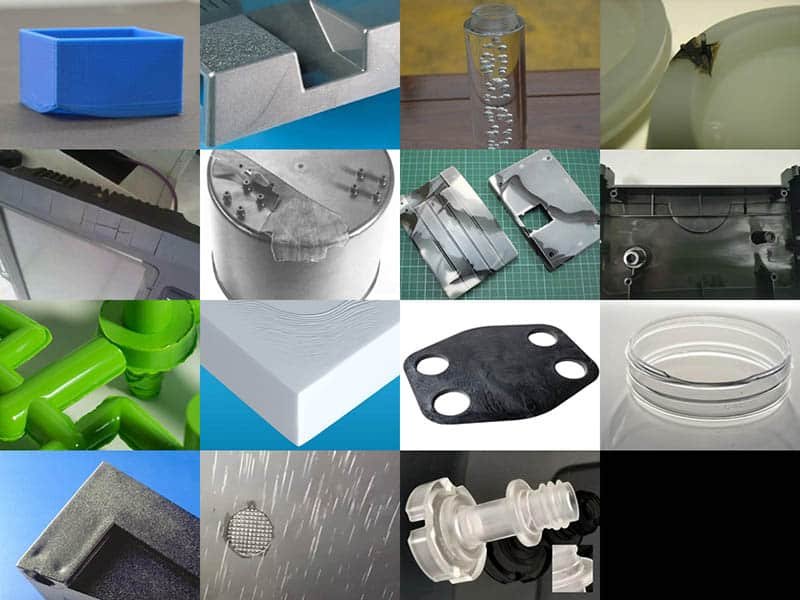
- Warping and Deformation: Caused by unequal cooling rates, internal stresses, or wall thickness variations, leading to parts not meeting specifications. Uneven cooling can result in energy imbalance, prone to deformation post-demolding.

- Part Sticking: A frequent issue where parts adhere to the mold, caused by insufficient mold release agents, rough mold surfaces, inadequate cooling, or high surface energy materials.
- Ejector Marks: Visible marks or scratches from ejector pins, often due to maintenance failures or improper processing, affecting surface finish.

- Difficulty with Complex Geometries: Parts with undercuts, textured surfaces, or low draft angles (e.g., 0.15º) are harder to demold, requiring higher ejection forces and risking damage.
Solutions to Prevent Parts Sticking in the Mold
Effective demolding begins with strategic part and mold design, and continues with proper material selection and process control. To prevent parts from sticking during demolding, consider the following solutions:
- Optimize Draft Angles: Incorporate at least 1°–2° draft per side for most vertical walls. For deeper cavities or textured surfaces, increase the draft accordingly to facilitate easier release.
- Apply Mold Surface Treatments: Utilize surface coatings such as PTFE, nickel plating, or chrome plating to reduce surface friction and minimize adhesion between the part and the mold.
- Use Mold Release Agents: Apply silicone-based or water-based release agents to form a non-stick layer on the mold surface. These agents also help prolong mold life and reduce wear.
- Improve Mold Design: Integrate a robust ejection system with ejector pins, lifters, or air-assist channels. Ensure uniform venting to eliminate vacuum forces that cause sticking.
- Choose Demolding-Friendly Materials: Thermoplastics like polypropylene (PP) are ideal for easy demolding due to their shrinkage characteristics. Avoid materials with high adhesion unless treated or assisted.
- Control Cooling Parameters: Ensure even and sufficient cooling before ejection. This enhances dimensional stability and promotes uniform shrinkage, reducing demolding resistance.
- Use Textured Surfaces with Caution: While textures can help mask surface defects, they can increase friction. Always balance aesthetic goals with demolding performance.
Case Study on Solving Parts Sticking in the Mold
Here is a practical case study conducted by Erye engineer team on how to solve parts sticking in the mold.
Project Introduction
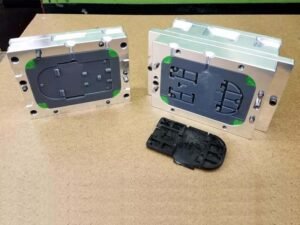
The product is an automotive accessory housing, with dimensions of 8mm x 7mm x 2.5mm and a wall thickness of 0.4mm. The material of the product is PPA + 30% GF (polyphthalamide with 30% glass fiber reinforcement). It uses a four-cavity mold (four samples are produced with one mold) with a submarine gate for production.
The molding conditions are as follows.
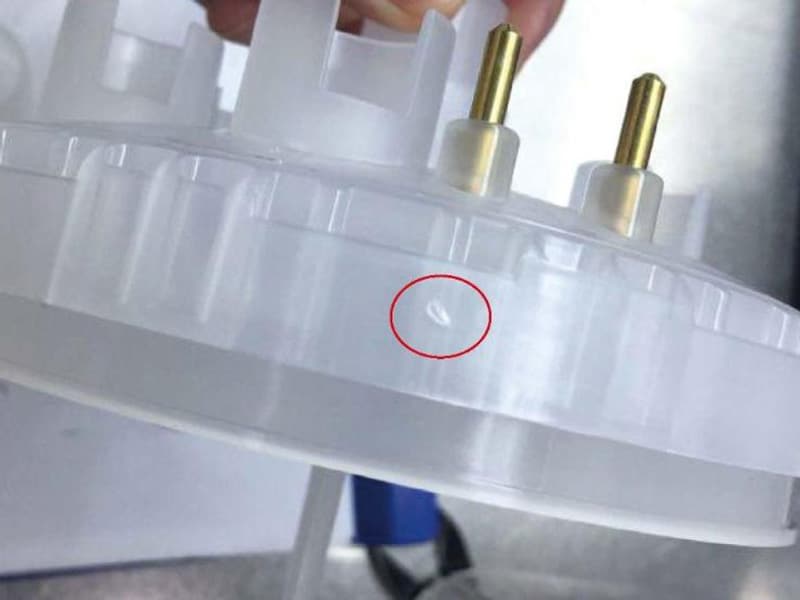
Product Issue

As shown in image (b), the isolated reinforcing rib has torn off due to sticking during demolding, resulting in a significant surface defect.
Cause Analysis and Solutions
Cause Analysis
After observing the injection molding defect, the typical approach is to investigate from the perspectives of product design, material selection, mold, and injection molding process. Our engineers investigate these dimensions, and the findings are summarized as follows.
- Product Design: From the product drawings and samples, it was observed that the fractured reinforcing rib lacked sufficient demolding angle or had a very small demolding angle. The wall thickness of the reinforcing rib is only 0.4mm, which is relatively thin.
- Material: The product uses PPA material with a large amount of glass fiber added, which reduces the product’s toughness and increases its brittleness.
- Mold: The mold surface had inadequate polishing, resulting in difficulty in demolding.
- Injection Molding Process: The injection pressure was high, increasing the difficulty of demolding.
Solutions
After analyzing the causes from the above perspectives and considering the actual project situation, we adopted the following measures to resolve the problem of demolding and sticking by adjusting:
- Product Design: Increase the demolding angle and try to increase the thickness of the reinforcing rib.
- Material: The material has certain influencing factors, but due to the particularity of the product, it must meet the performance requirements and use the material specified by the customer. This cannot be changed.
- Mold: Polish the mold surface. The polishing texture must align with the demolding direction.
- Injection Molding Process: Reduce the injection pressure to lower the sticking force.
Conclusion
Demolding is a critical step in injection molding, with significant implications for part quality and production efficiency. Common challenges like warping, sticking, and ejector marks can be addressed through careful mold design, material selection, and process control. Solutions such as mold release agents, improved mold surfaces, and adequate cooling are practical ways to prevent parts from sticking, ensuring high-quality outputs.
If you encounter additional injection molding challenges, feel free to contact us. As a professional custom manufacturer, Erye Molding is dedicated to providing high-quality injection molding solutions tailored to your needs, ensuring a smooth and efficient production process.